Showing posts with label Electronics and Electrical. Show all posts

Friday, April 9, 2010

DELAY TIMER PROJECT-BASIC ELECTRONICS

Introduction to Delay Timer
In this Delay Timer project, all analog parts are being used with the thyristor as a device that switches an AC Relay ON or OFF depending on the timing of the RC circuit. The input mains supply used ranges from 220VAC to 240VAC and an AC relay (220-240VAC) is used to switch a load. The load to be switched must be within the current and relay ratings. This circuit is useful for use of devices that need to be OFF for a minimum of 150 - 210 secs after a mains supply have cuts off. Devices such as compressors and halagon lamp cannot be OFF and ON repeatedly within a short period of time as it will cause damage to the devices.
The use of microcontroller based devices are not reliable in that if the power supply cuts off and came back again in a short period of time, it will reset and "forgotten" its previous state. The use of RC circuitry as a timer circuit is reliable and is not susceptible to "memory loss" as in the case of microcontroller.
If a microcontroller based solution is used, extra circuitry such as backup battery or supercapacitor need to be incorporated in order to retain the memory of the MCU and to ensure that the clock still runs even after the supply has cuts off.
This project should be handled by experienced electronics designer as its part are powered on directly from the mains supply. As all parts is "live", one may get electric shock if care is not taken when testing the circuit. Some parts may "burst" if there are some short circuit in the circuit. It is not recommended to use breadboard to test the circuit. Circuit should be tested using printed circuit board and an isolating variable transformer where the voltage is slowly ramped up from zero.
Once tested working, the components should be potted using epoxy with only the terminals exposed. All parts are potted to prevent users from touching the parts.


google_protectAndRun("ads_core.google_render_ad", google_handleError, google_rend
Schematic Diagram
The schematic below shows the circuit diagram of the ON delay timer. Once the mains power supply cuts off, the relay will only be able to turn ON after a period of 150 - 210 secs depending on the tolerance of the RC circuit represented by resistor R7(5.1 Mohm) and electrolytic capacitor E2(47uF). More accurate timing can be achieved by using low tolerance resistor and capacitor.
The thyristor used can be either 2P6M or MCR106-8 or equivalent parts available in the market. Relays used should have coil ratings below 1A in order not to overheat the SCR. No heatsink is required for the SCR.
At power on, there is no charge at E2, hence the transistor Q2 will be forward bias and turn ON when Q3 turn ON. Once these two transitors are ON, the SCR will turn ON as well. The use of C1 and R6 across the SCR acts as a snubber circuit to reduce the switching noise generated by the SCR when it turns OFF/ON. During the ON stage of the SCR, the capacitor E2 is charged to its maximum value. When the mains supply cuts off, the charge at capacitor E2 will cause the base of transistor Q2 to be reverse bias and cannot turn ON until almost all the charges have been discharged through resistor R7. Once the charge has been discharged (which will take around 150 - 210 secs for the values shown), transistor Q2 will be able to turn ON.
The timing of the circuit can be changed by reducing or increasing the RC values of R7 and E2.


Parts List The parts list of the delay timer circuit is as shown below.


Sunday, April 4, 2010

BASIC ELECTRONICS-TIMER CIRCUIT DESIGN

Introduction
Timer circuit has been used in many projects and there are basically 2 types that are used these days. One of them is the use of analog RC circuit where charging of the capacitor circuit determined the T(time) of the circuitry. This type of circuitry has larger tolerance and is used in applications where the T is not so critical as the T is affected by the tolerance of the RC components used.
The other is the use of crystal or ceramic resonators together with microprocessor, microcontroller or application specific integrated circuit that need higher precision T in the tolerance of up to 5 ppm (parts per million).


555 IC
One commonly used circuit is the 555 IC which is a highly stable controller capable of producing timing pulses. With a monostable operation, the T(time) delay is controlled by one external resistor and one capacitor. With an astable operation, the frequency and duty cycle are accurately controlled by two external resistors and one capacitor. The application of this integrated circuit is in the areas of PRECISION TIMING, PULSE GENERATION, TIMING DELAY GENERATION and SEQUENTIAL TIMING.
A typical 555 IC block diagram is as shown below.


Monostable Operation

Figure below shows the monostable operation of a 555 IC.


In this mode, the device generates a fixed pulse whenever the trigger voltage falls below Vcc/3. When the trigger pulse voltage applied to pin 2 falls below Vcc/3 while the its output is low, its internal flip-flop turns the discharging transistor Tr off and causes the output to become high by charging the external capacitor C1 and setting the flip-flop output at the same instant. The voltage across the external capacitor C1, VC1 increases exponentially with the time constant T=RA*C1 and reaches 2Vcc/3 at td=1.1RA*C1. Hence, capacitor C1 is charged through resistor RA. The greater the time constant RA*C1, the longer it takes for the VC1 to reach 2Vcc/3. In other words, the time constant RA*C1 controls the output pulse width. When the applied voltage to the capacitor C1 reaches 2Vcc/3, the comparator on the trigger terminal resets the flip-flop, turning the discharging transistor Tr on. At this time, C1 begins to discharge and its output goes to low.

Astable Operation


An astable operation is achieved by configuring the circuit as shown above. In the astable operation, the trigger terminal and the threshold terminal are connected so that a self-trigger is formed, operating as a multivibrator. When its output is high, its internal discharging transistor Tr turns off and the VC1 increases by exponential function with the time constant (RA+RB)*C. When the VC1, or the threshold voltage, reaches 2Vcc/3, the comparator output on the trigger terminal becomes high, resetting the F/F and causing its output to become low. This in turn turns on the discharging transistor Tr and the C1 discharges through the discharging channel formed by RB and the discharging transistor Tr. When the VC1 falls below Vcc/3, the comparator output on the trigger terminal becomes high and the timer output becomes high again. The discharging transistor Tr turns off and the VC1 rises again. The frequency of oscillation is given as below.

Sunday, December 27, 2009

HOW TO MAKE A HEART RATE SENSOR?-BIOMEDICAL PROJECTS

I HAVE  ARRANGED A SCHEMATIC ABOUT MAKING A HEART RATE SENSOR

DOWNLOAD THE CIRCUIT DIAGRAM FOR THE HEART RATE SENSOR

DOWNLOAD

SOMETHING MORE

Here is the inside of the light reflectance sensor (top) and a schematic drawing of it's circuitry (bottom). First, carefully remove the phototransistor as shown. Then, attach the three wires that we will connect to the heart sensor (show in bright yellow).

Hint: if you leave the leads from the phototransistor when you cut it off, you can attach the two corresponding wires directly to them, rather than to the circuit board itself.


Reblog this post [with Zemanta]

HOW TO MAKE HEART RATE MONITOR RECEIVER By RICK MOLL?-BIOMEDICAL PROJECTS

IDEA

Commercial HRM transmitters are available from several manufacturers. The HRM receiver


described here allows these transmitters to be interfaced to a small microcontroller or PC.


The HRM receiver is built on a 2.5 x 1.8 inch printed circuit board. It can be interfaced to just about any microcontroller that has an analog input. It will operate from the same 5V supply that powers the microcontroller. With each heart beat signal it receives from a wireless HRM transmitter, it outputs an analog pulse. These pulses are typically sampled with a microcontroller ADC port.

HRM Transmitter

This wireless HRM transmitter was manufactured by Polar, who claims to be the world's leading producer of wireless HRM equipment. Cardiosport and Sports Instruments manufacture similar equipment.


These transmitters are worn around the chest and generate a 5kHz magnetic pulse with each heart beat they detect. The transmitted magnetic signals are fairly weak, but typically have a range of over 3 feet.

These HRM transmitters can be purchased for as little as $40 (USD), or along with a no frills wrist style receiver for around $50 (USD).

circuit description

schematic

code


for any further querry contact the administrator


Reblog this post [with Zemanta]

IMPROVED VERSION OF MUSCULAR BIO STIMULATOR-BIOMEDICAL PROJECTS

This circuit is a big improvement of the small Muscular Bio-Stimulator design


DOWNLOAD THE CIRCUIT DIAGRAM

COMPONENTS REQUIRED
P1_____________100K  Linear Potentiometer
P2,P3___________10K Linear Potentiometers

R1_____________560K 1/4W Resistor
R2______________68K 1/4W Resistor
R3,R4___________10K 1/4W Resistors
R5______________22K 1/4W Resistor
R6,R7____________4K7 1/4W Resistors
R8_____________330R 1/4W Resistor
R9_______________2K2 1/4W Resistor
R10____________470R 1/4W Resistor
R11_____________47R 1/4W Resistor

C1_______________1µF 63V Polyester Capacitor
C2,C3__________100nF 63V Polyester or Ceramic Capacitors
C4_____________220nF 63V Polyester Capacitor
C5_____________220µF 25V Electrolytic Capacitor

D1______________LED (Any dimension, shape and color)
D2,D3________1N4148 75V 150mA Diodes

Q1____________BC547 45V 100mA NPN Transistor
Q2,Q3_________BC327 45V 800mA PNP Transistors

IC1,IC2________7555 or TS555CN CMos Timer ICs

T1_____________230V Primary, 12V Secondary 1.2VA Mains transformer (see Notes)

SW1,SW2________SPST Toggle or Slide Switches

Notes:


  • T1 is a small mains transformer 230 to 12V @ 100 or 150mA. It must be reverse connected, i.e. the 12V secondary winding across Q3 Collector and negative ground, and the 230V primary winding to P3 and output Electrodes.

  • The circuit has been thoroughly tested, and it works nicely when supplied in the 3V - 9V range. Running on 3V supply with a 12V 1.2VA transformer it would be no more dangerous than the circuit already published. But please note that using 9V battery supply it can output 120V signals and could be very dangerous.

  • Electrodes can be obtained by small metal plates connected to the output of the circuit via usual electric wire and can be taped to the skin. In some cases, moistening them with little water has proven useful.

  • Commercial sets have frequently a built-in 30 minutes timer. For this purpose you can use the Timed Beeper the Bedside Lamp Timer or the Jogging Timer circuits available on this Website, adjusting the timing components to suit your needs.


Reblog this post [with Zemanta]

Thursday, December 24, 2009

FINGER PLETHSYMOGRAPH TO MEASURE BLOOD RESISTIVITY-BIOMEDICAL PROJECTS

SUMMARY ABOUT THE PROJECT

Impedance plethysmography can be used to measure arterial volume change that occurs with propagation of the blood pressure pulse in a limb segment. For this measurement, we assume a constant value of blood resistivity.

However, blood resistivity may change under both physiological and pathological conditions. Use of an impedance plethysmograph on a finger immersed in a saline filled beaker may yield a method for determining this change in blood resistivity.

This may develop into a method that diabetics can use to measure glucose levels non-
invasively.  The goal of our project is to design a finger plethysmograph to measure blood resistivity.

PROBLEM STATEMENT
Our goal is to design a finger plethysmograph to measure blood resistivity.  In order to
accomplish this, we will need to design and build a data acquisition device to acquire the signal
from the finger.

The device should mechanically immobilize the test subjects’ finger such that motion artifacts are kept to a minimum.

This device should be able to detect the electrical potential (voltage) change across the finger so that the change in resistance may be determined.
It should be able to detect the velocity-dependent change in blood resistivity due to arterial blood pulsations.
In addition, we will need to build an electrical circuit to perform signal processing and
analysis.  This circuit should be capable of rectifying the alternating current (AC) signal from the finger data acquisition device and modulate it into a direct current (DC) signal to be analyzed.  The circuit should be capable of discerning or visually displaying the voltage changes caused by correlated changes in blood resistivity.

As an added feature, this circuit may contain an automatic reset function capable of adjusting one of the differential amplifier inputs to that of the output from the data acquisition (finger holder) device.

This will allow the device to easily accommodate fingers having different electrical resistances and will prevent having to manually adjust voltages using a potentiometer to match independences with each new test subject or finger position.

FPDOWNLOAD THE COMPLETE PROJECT REPORT FROM HERE

LINK 1


Reblog this post [with Zemanta]

Sunday, December 20, 2009

HOW TO CHECK AMOUNT OF SALT IN LIQUID?-BIOMEDICAL PROJECTS

PURPOSE OF DEVICE

This circuit was designed to detect the approximate percentage of salt contained in a liquid. After careful setting it can be useful to persons needing a quick, rough indication of the salt content in liquid foods for diet purposes etc.

DOWNLOAD THE CIRCUIT DIAGRAM

WORKING OF CIRCUIT

IC1A op-amp is wired as a DC differential amplifier and its output voltage increases as the DC resistance measured across the probes decreases. In fact, fresh water has a relatively high DC resistance value that will decrease proportionally as an increasing amount of salt is added.
IC1B, IC1C and IC1D are wired as comparators and drive D5, D4 and D3 in turn, as the voltage at their inverting inputs increases. Therefore, no LED will be on when the salt content of the liquid under test is very low, yellow LED D5 will illuminate when the salt content is low, green LED D4 will illuminate if the salt content is normal and red LED D3 will illuminate if the salt content is high.
D1 and D2 are always on, as their purpose is to provide two reference voltages, thus improving circuit precision. At D2 anode a stable 3.2V supply feeds the non-inverting inputs of the comparators by means of the reference resistor chain R8, R9 and R10. The 1.6V reference voltage available at D1 anode feeds the probes and the set-up trimmer R4.
One of these two red LEDs may be used as a pilot light to show when the device is on.

HOW TO MAKE PROBES?

It was found by experiment that a good and cheap probe can be made using a 6.3mm. mono jack plug. The two plug leads are connected to the circuit input by means of a two-wire cable (a piece of screened cable works fine).
The metal body of the jack is formed by two parts of different length, separated by a black plastic ring. You should try to cover the longest part with insulating tape in order to obtain an exposed metal surface of the same length of the tip part, i.e. about 8 to 10mm. starting from the black plastic ring.
In the prototype, three tablespoons of liquid were poured into a cylindrical plastic cap of 55mm. height and 27mm. diameter, then the metal part of the jack probe was immersed in the liquid.

NOTES

  • Wait at least 30 seconds to obtain a reliable reading.

  • Wash and wipe carefully the probe after each test.

  • To setup the circuit and to obtain a more precise reading, you can use a DC voltmeter in the 10V range connected across pin #1 of IC1A and negative supply.

  • Set R4 to obtain a zero reading on the voltmeter when the probe is immersed in fresh water.

  • You may change at will the threshold voltage levels at which the LEDs illuminate by trimming R4. Vary R8 value to change D4 range and R9 value to change D5 range.

  • P1 pushbutton can be substituted by a common SPST switch.


FOR MORE INFORMATION CONTACT ADMINISTRATOR
Reblog this post [with Zemanta]

HOW TO MAKE A WIRELESS ELECTROCARDIOGRAM(ECG) MONITOR-BIOMEDICAL PROJECTS


[caption id="" align="aligncenter" width="300" caption="Image via Wikipedia"]Schematic diagram of normal sinus rhythm for a...[/caption]


Introduction

The electrocardiogram (ECG or EKG) is a noninvasive test used to measure the electrical activity of the heart. An ECG can be used to measure the rate and regularity of heartbeats, the position of the chambers, the presence of any damage to the heart and the effects of drugs and devices used to regulate the heart. This procedure is very useful for monitoring people with heart disease or to provide diagnosis when someone has chest pains or palpitations.


Leads are placed on the body in several pre-determined locations, usually the extremities or the front of the chest, to provide information about heart conditions. For our final project, we implemented a wireless electrocardiogram monitor.


The following figure describes the overall high-level design for our ECG monitor:

High-Level

Three leads are placed on the subject --usually one on each side of the chest and on the lower abdomen. This signal is sent to the amplifier where it is amplified by a factor of one thousand. The signal is then sent to the voltage to frequency converter (VFC), which converts the signal to a frequency so that it can be transmitted. Since we desired the amplifier, VFC and transmitter to operate using only a single 9 V battery, a separate source splitter circuit was used to provide the proper voltage to each of the components.


Once the signal is received using the radio receiver, a voltage summer is used to add an offset voltage of approximately 800 mV to the signal in order to make the signal entirely positive. This signal is then amplified by a factor of three so that its maximum value exceeds the threshold of the required voltage for the frequency to voltage converter (FVC). After the signal is passed through the FVC, the output signal is displayed on an oscilloscope.


Hardware

The following schematic shows the amplifier section of the circuit:

DOWNLOAD THE SCHEMATIC

With the reference lead of the the subject placed to ground, each of the input chest leads is sent to an input of the INA121 instrumentation amplifier. Using a 4.7k resistor, a gain of 11.7 results from this stage. Following the instrumentation amp, the signal is passed through two 10 uF capacitors, placed back to back. The capacitors are used to prevent baseline drift in the ECG signal. Putting two directional capacitors back-to-back forms a bi-directional capacitor. A time constant of 0.5 second was chosen to approximate the frequency of a standard ECG signal (a resistor of 100k can be connected to ground after the capacitor in order to make a time constant of 0.5 sec, but we found that this resistive element is unnecessary). This section is followed by two inverting amplifiers each with a gain of ten. The total gain of this part of the circuit is approximately equal to one thousand.


The following schematic, obtained from the LM231 data sheet, shows the VFC circuit used in our monitor:


equ1


DOWNLOAD SCHEMATIC1


V_logic is connected to the power supply Vs and all ground are connected to the negative terminal of the battery. Fout is a square wave of varying frequency with a maximum amplitude of Vs. A voltage divider is needed (200k and 10k variable resistor connected in series) is needed at pin 3 to scale the voltage down to around 20 -50 mV.


The output of the voltage divider is connected to the input of the transmitter shown in the circuit diagram below.


Please note: We added everything on this schematics except for the 22k and the offset adjust. We neglected those two elements completely.


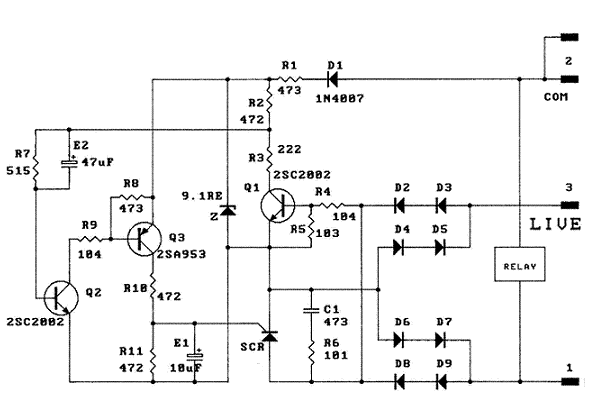
The following schematic describes the the source-splitting and transmitter section of our project:source-_trans


The source-splitting amplifier allows three different potential reference: + 4.5V, -4.5V and Ground. Since the BA1404 can only have +3V as its power supply, we used two diodes to create a total drop of 1.4V and this allows the transmitter to function properly. Another advantage to this setup is that every elements on this circuit can be powered off a signal 9V battery. Although not noted on this schematics, one should know that the input to the transmitter should be on the order of mV (5 - 50mV). Implementing a variable voltage divider to the input is very important. The nice thing about this setup is that one does not need an DC offset circuitry to adjust ECG signal from the output of the amplifier. Since our VFC is powered between -4.5V and +4.5V, it has a 4.5V offset already. If the ECG signal is centered at 0V with a swing from -0.5 to +0.5V, then the VFC sees it as 3.5V to 4.5V swing. It is important to know that VFC cannot have negative voltage as its input. Furthermore, making an inductor at the tunable FM transmitter range is a painstaking process. We found that by turning a wire 4 times around the pen allows the signal to be transmitted at 90 MHz.


Receiver Circuitry:


The following schematic shows the voltage summer and amplifier section of the project:


Summing Amplifier


This section consists os a summing amplifier with a gain of one cascaded with an inverting amplifier with a gain of approximately two. The summer takes the input obtained from the receiver (a FM radio tuned at approximately 90 MHz) and adds it to a constant voltage obtained using a simple voltage divider. This signal is then sent to an inverting amplifier which provides a gain of two and inverts the signal after it has been inverted by the summing amplifier. The reason we amplified the signal is due to the fact that FVC (LM231) needs at least a 2V peak-to-peak amplitude. The signal coming from the radio receiver has a peak-to-peak amplitude around 500 mV. Increasing the volume will normally increase the signal amplitude but it will also decrease the signal-to-noise (SNR) ratio. The amplifier we designed at the receiving end increase the signal to at least 5V of peak-to-peak amplitude, which is sufficient for FVC conversion.


The following figure shows the FVC circuit, also obtained from the LM231 data sheet:


equ2


Equation used to calculated the voltage output due to the frequency responseFVC


Results


One of the most difficult parts about this project is setting up the VFC (Voltage-to-Frequency) and FVC (Frequency-to-Voltage). Through many experimentations, we found out that the VFC can not convert a signal varying more than 16 Hz into pulse train. For example, when we fed in a 100 Hz sine wave, we were getting a constant square as the output (thus a constant DC voltage). This could be a potential problem for ECG transmission since the QRS peak can occur as fast as 20 to 50 Hz. However, when we fed in square waves of varying frequency into the FVC, we could get a varying DC voltage as expected. This is probably the reason why we could not receive a nice-looking ECG waveform on the receiving end. Also, we believe that the signal was attenuated during the transmission process. We had a difficult time receiving a nice looking square wave from the FM radio receive. However, we were able to fix that problem by increasing the volume on the radio to create better rising and falling edges for the FVC. Finally, we noticed that our transmission range is about 10 feet, which is not very useful for a wireless ECG. The pictures below demonstrate our final result:


114-1431_IMG


Transmitter Section (this includes, pre-amp, source-splitting, FM transmitter and VFC).


IMAGES OF CIRCUIT


1,


2,


3,


4,


5,


6,


REFERENCES


LM231.pdf (VFC and FVC)


LM158.pdf (Operational Amplifier)


INA121.pdf (Instrumentation Amplifier)


http://www.medicinenet.com/Electrocardiogram_ECG_or_EKG/article.htm


http://www.nlm.nih.gov/medlineplus/ency/article/003868.htm
Reblog this post [with Zemanta]
Your Ad Here